Welcome to another exciting edition of Inspector Pumphead’s Classroom! In this feature, we’ll be talking about various small, simple pump “How-To’s” that any homeowner or facilities manager can tackle.
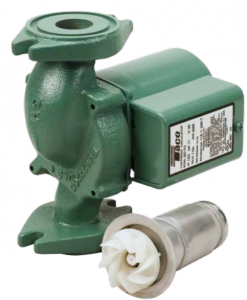
Next up: How to Replace the Cartridge on a Taco 007 Circulator Pump.
As the name suggests, circulator pumps are used to keep hot water circulating throughout your water system so that it is immediately available at point of use. For those of us who live in colder climates, the coming winter months are a particularly annoying time to have to wait for water at the sink or tub to heat up. The presence of a circulator pump ensures that hot water is always readily available.
The Taco 007 is built for quiet operation in hydronic heating, radiant heating, hydro-air fan coils, indirect water heaters, chilled fresh water and domestic water circulating systems. The cartridge style design means the actual circulating mechanism is contained in an easily serviceable or replaceable single unit. It is perhaps the most popular cirulator on the market and plenty are always available in stock.
In the video below, Pump Products application engineer Nick, who I have personally trained, will walk you through the process of replacing the cartridge, using the Taco 007-F5 pump and the proper Taco replacement cartridge (the cartridge package should also include a replacement gasket and spare bolts as well).
You can also purchase the full suit of Taco Repair parts.
You can also continue reading below for a written breakdown.
Items and Materials
The only tool you’ll need is a hexagonal Allen key (or Allen wrench). Make sure you have the replacement cartridge handy as well.
Steps
–Turn off the water flowing through your system. You do not need to remove the pump base outlets from the piping.
–Identify the four casing bolts.
–One by one, use the proper Allen key to loosen the bolts.
–Remove the bolts.
–Remove the motor casing from the volute. Inside the motor casing you will see the cartridge.

–The cartridge should be solidly in place. Tug gently but firmly until the cartridge is out of the casing.
–Discard used cartridge.
–Take the replacement cartridge and firmly insert into the volute.

–Firmly place the replacement rubber gasket into the lip of the volute base. The gasket is important for creating a seal.

–Line up the base plate and the volute to the base and connect them. Be sure to match up the bolt holes.

–Insert the bolts and tighten only until each is roughly equally snug. Uneven tightening could cause leaks in one area.
–Complete the tightening on all four bolts in a crisscross pattern to ensure evenness on all sides.
And there you have it. It’s a simple and cheap process, one that any person should reasonably be able to complete. With winter upon us, making sure your circulator pump and cartridge are up to the task at hand is very important.
Do you have any suggestions for other “How To” videos you’d like to see? Let us know in the comments!
Pump Products application engineers are standing by to help you find the right pump, as well as to provide price quotes, stocking availability and shipping information. Call our toll free number 1-800-429-0800 to speak to an expert today.


